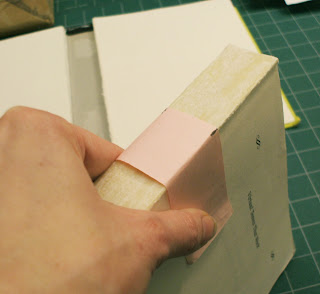
This repair reattaches a hardcover case to a text block without replacing the endsheets and super. A strip of paper, folded thrice, is used to rejoin the text block and case at the spine without losing the important open "tube" along the spine. "One on, two off" refers to the three sides of the folded paper -- in this version of the repair, one of the three folds will be glued onto the spine of the text block, while the other two will be off the text block and glued to the spine inlay of the case.
If it sounds complicated so far, fear not! Let's look at what we're dealing with and gather the tools we'll need.
This type of damage is a perfect candidate for a hollow tube repair. The text block is whole (the binding is not coming apart) and so is the case (there are no tears at the joints or at the headcap) -- but they have completely separated. To recase this book, we'll need:
- A strip of medium-weight paper (about the same as for an endsheet, 70# or 80#). This paper must be at least 3 times wider than the thickness of the text block and at least as tall (we will fine-tune these measurements momentarily) and the grain must be running the long way (parallel to the spine).
- PVA adhesive and a brush
- Bone folder
- Scalpel or x-acto knife
- Ruler with a metal straightedge
- Strip of scratch paper
- Pencil
Step 1. Ensure that the spine of the text block presents a smooth surface to glue onto. Remove any loose, lumpy or wrinkled spine linings or lumps of old adhesive by peeling them off or by applying methyl cellulose and scraping the spine clean. When it's dry, you can lightly sand the spine to smooth out stubborn old spine linings. I don't always worry about getting the spine completely clean, but the smoother the surface, the better the hollow tube will adhere.
Step 2. Find the width of the spine of the text block by wrapping a strip of scratch paper around it, marking at each shoulder, and measuring with a ruler between the marks. This width is the only measurement you'll need.
 |
| Score and fold once, then score and fold again.. |
 | ||
| Then cut (being careful not to cut into the folded-over edge)! |
 |
| Result: the strip of paper is folded into thirds, and each third equals the width of the spine of the text block. |
Step 4. Check the fit of the tube and trim its height.
 |
| The three sides of the tube should all fit from shoulder-to-shoulder on the text block, especially the mid-section, which will be attached directly to the spine. |
 | ||||
| Trim the height of the tube with scissors or a scalpel to just slightly shorter than the height of the text block. |
Step 5. Adhere the tube!
 |
| Apply an even layer of PVA to the spine. |
 | |
| Attach the middle section of the tube to the spine and burnish generously with a bone folder to smooth out any bubbles or lumps. |
 |
| Fold down one side before applying PVA -- then brush on the glue after folding. |
 |
| Fold the second side down onto the PVA and burnish well. |
Step 6. Reattach the case. Glue up the folded tube..
 |
| The last coat of PVA onto the folded-up tube. |
.. and set the text block spine-down firmly into the case. Make sure that the head and tail of the endsheets are lined up with the pages, and that the text block is seated in the center of the case -- and that the text block isn't upside-down.
 |
| Allow the tube to dry under pressure for a few hours. |
That's it; one of my personal favorite repairs for its ease, durability and invisibility! Please hit me up in the comments or in e-mail if you have any questions.. or improvements!
Also, if you have some experience with book repair but are interested in a hands-on opportunity to build your skills and learn a few new ones, consider joining me at the Support Staff Division conference this summer in Eugene, where we'll have an intermediate book mending session dedicated to some techniques not covered in the basic workshop (endsheet replacement; paper repair; simple enclosures) and to solving your most procrastinated repair jobs. Full information about the 2012 conference is here!
Many thanks! The next Fix-It Friday will be posted on Friday, June 8.
Carolee Harrison
PSU Library


No comments:
Post a Comment